Create Graphics Using PicMonkey, Canva, Visme and Photopea [A Review]
This content compares and reviews four design and editing platforms: Photopea, Canva, Visme, and PicMonkey, highlighting their pros and cons.
![Create Graphics Using PicMonkey, Canva, Visme and Photopea [A Review]](https://cdn.shortstack.com/website/blog/create-graphics-using-picmonkey-canva-visme-and-photopea-a-review/68b0e48f5ce298524fa010b8_6537def9f522c0a5123d91bb_graphic-4.png)
Designing custom images for your business can be costly, time-consuming, and just plain overwhelming. However, sometimes you just gotta do it. I have ZERO graphic design experience. Nevertheless, I decided to take a stab at creating some images using some of our team’s favorite design and editing tools to see just how easy these platforms are to use.I gave myself a maximum of two hours on each site to complete a header image for a campaign on ShortStack. However, keep in mind that these services can be used to create graphics for all sorts of reasons, like social media posts (they are VERY popular among Instagram influencers), your website, or whatever you may need.Because I’m a novice designer, I also asked my coworker, Justin, to check out the tools. He has intermediate knowledge of graphic design tools, so I thought his perspective working with the different platforms would be helpful to folks deciding which option they want to check out.
Photopea
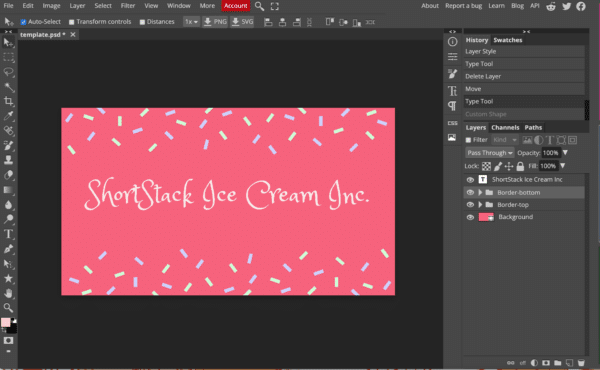
Photopea is a 100% free platform that you can use to design and edit images. You can pay for a premium account to have the ads removed, but whether or not you pay, you get access to all of the features, which is awesome. First Impression: Photopea looks and feels a lot like Adobe Photoshop. There is a good selection of free templates to help you get started on a brand new project. Pros: I liked the ability to quickly select the image size you need based on the use case (i.e. Facebook cover photo or Instagram post). Also, I appreciated the wide variety of font options available. I could also see how the option for complete design customization is useful for more advanced designers. Best of all, it’s totally free!Cons: It took me a while to figure out the different functions. There is no tutorial, you’re just encouraged to pick a project and go. The help is a bit buried so it can get a little confusing, especially for people like me who don’t have experience in Photoshop. Overall Review: It took me 1.5 hours to edit and create the header image, which was under the two hours I allotted. It was easy to pick a template design I liked and to make it my own. As a first-time user, it took me a while to figure out how to change the colors for each layer of my design. Once I figured it out, the rest of the design process went well. In this design, I didn’t even get a chance to mess with all of the features Photopea offers. In addition to using a template, you can edit any photo or start a design from scratch. Personally, I would have appreciated a simple click-through tutorial or video (like the ones we provide for ShortStack University) just to get an idea of what each button does. However, they do have a Reddit page, where you can ask for help and get tips on using Photopea. Justin’s Take: For intermediate/professional designers, Photopea is like putting on a comfy pair of slippers - instantly familiar. The layout is basically identical to Photoshop 6; so if you’re used to editing with the Adobe Creative Suite (or even some of the other notable design programs like GIMP, Procreate or Affinity Photo) you’ll have no problem finding most of what you need to jump straight in. However, I wouldn’t recommend Photopea as a straight-up replacement for Photoshop, as it is missing some features that a power-user would notice immediately. For a quick and dirty way to whip up a graphic from scratch for free, it’s hard to find a platform that’s better than Photopea. One downside, Photopea recently started adding huge ads to the side of the screen which cuts down on your workspace quite a bit. However, you can upgrade to a paid plan (surprise!) to remove them. While Photopea is a great free browser software, if you’re going to pay to remove ads, then you might consider paying a little bit more for a more road-tested paid software.
Canva
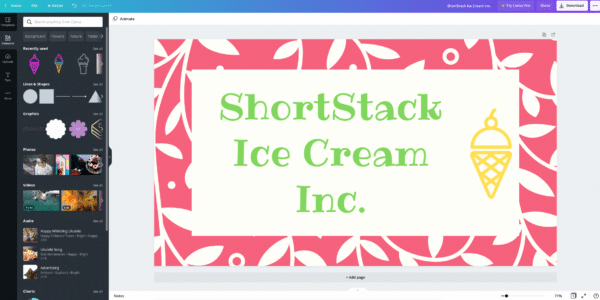
According to Canva, their platform is for individuals and teams who “want to design absolutely anything.” Canva has both a free and a paid option. Some features of the paid plan are unavailable with the free option. First Impression: Canva offers lots of size guides (i.e. Facebook cover page, blog banner, etc). A simple click-through tutorial (only four steps) pops up to help you get started. There are lots of templates, which can be overwhelming, but the user-friendly design for editing is refreshing.Pros: Super easy-to-use drag-and-drop design. A lot of design options are available with the free version. You really can’t mess up! Plus, the design elements they provide are fresh and stylish.Cons: Paid features are shown alongside the free features, and you can’t filter the templates, fonts, and pictures to only display the free versions. Creating fully custom content is harder than with Photopea.Overall Review: Canva is great when you don’t have a lot of time to spend and need to produce something quickly. I created my header in an hour. I appreciated the simple tutorial that let me know where to go for different features. I also like the number of free templates, pictures, clip art, fonts and other design elements they offer. It was frustrating when I would click on an element and a pop-up would ask if I wanted to try the paid version every. single. time. However, if that is my biggest complaint, then I’ve gotta say, Canva is a great option.Justin’s Take: I don’t think making a professional-looking graphic or video can be any easier than what Canva offers. While the whole process is pretty “on rails” (everything basically comes down to selecting your favorite from a library of options), it’s still impressive how quickly you can put together a graphic or video that looks like it took hours to create. If you do want to get a little more granular with your design, the editing capabilities are plentiful. However, you won’t have the precise control you’d have with something like Photoshop or Photopea. Noticeably absent is anything resembling a layers panel, which would make it easier to select an element to edit vs. having to click what you want to edit in the preview area.
Visme
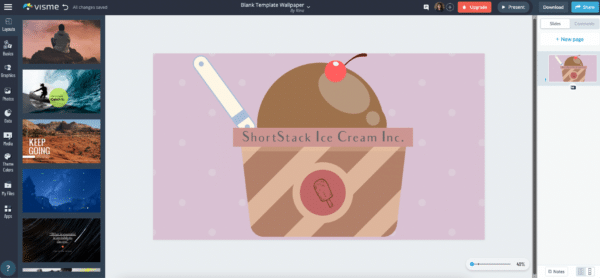
On their site, Visme claims you can, “Create visual brand experiences for your business whether you are a seasoned designer or a total novice.” Being a total novice, their claim was true for me! That being said, Visme has several options that can suit everyone’s needs from personal to professional, including a free trial. First Impression: I Ioved seeing all of the tips and tricks pop up while I worked on my design. Even a resource guide with links to their blog and help articles appeared, which I found useful. Pros: It’s insanely easy to use. I created the above image in 10 minutes. The pre-made themes are all beautiful and they made designing my image a breeze. The customization options available are also superb. Cons: While they do provide a free plan, their pricing starts at $29 a month. In my opinion, the features Visme provides are worth it, but this might seem a bit steep to some. I would have liked more clip art options. While Visme has more free options than Canva, they have fewer options in total. Overall Review: I enjoyed using Visme to create my design. The easy-to-use platform made me feel comfortable and confident that I could create a design I was happy with. I found it easy to add clickable links and animations to designs. I also appreciated the help tips that would pop up as I was navigating their design tools. The only downfall is the price of the premium plan; however, the free trial gives you a lot of customization options. Justin’s Take:At first glance, Visme seems very similar to Canva: a streamlined experience set up to allow you to create professional-looking content with very minimal work. However, Visme is definitely more focused on a business user. While they do have predefined options and templates for all sorts of different graphics and videos, their platform is primarily focused on building content for presentations, infographics and other business-related collateral and the content designer reflects this.Overall, it’s another solid option for creating content quickly with little to no design experience needed. Certain features are available in Visme that a more advanced designer will find handy, such as an “objects list” that acts as a layers panel.
PicMonkey
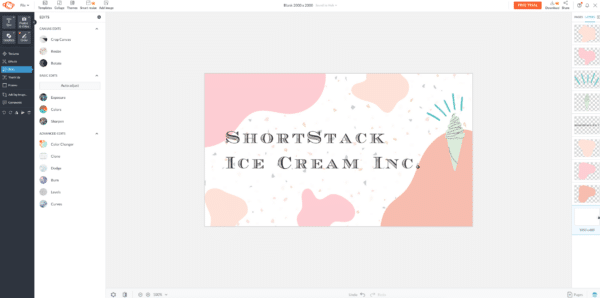
PicMonkey is a subscription-based platform with a few different plans. While they are a subscription site, they have a one-week free trial. Their lowest option is only $8 a month, which I honestly think is a steal for the value!First Impressions: I really like the combined functionality of drag-and-drop with the insane level of customization you can achieve. Even though PicMonkey did not provide a tutorial, it was easy to get started. Pros: Easy drag-and-drop design. The platform combines the ease-of-use of Canva and the ability to customize every aspect of your design like Photopea and Photoshop. The plethora of design elements, such as ‘artistic blobs’ that can be rotated, flipped, sized up or down, color and transparency, is fantastic! Cons: Overall, I’m not a fan of the templates they provided for a simple website header. Also, it does require a monthly subscription to use the service.Overall Review: Out of all three platforms I tested, PicMonkey is my favorite. Despite my lack of design experience, it was easy for me to create something pleasing to the eye. I found myself getting excited about all of the design tools such as borders, clip art, textures, shapes, font choices, etc. Designing my header image was a pleasant and fast experience; it only took me an hour. The hardest part of designing my image was finding a template that would work. Once I found something I liked, I was able to adjust colors, add a few more shapes, and BAM, I was done. Justin’s Take:PicMonkey has a bunch of pre-built templates and a seemingly-infinite number of designs for you to choose from to get up and going quickly. Being a Shutterstock product and having access to Shutterstock’s impressive collection of stock images, the platform’s content editor has a beefier focus on photo editing than most of the others. This is nice for making tweaks to any photos you want to use before locking them into place. The editor also has a layers panel showing by default on the right side of the screen, which in my opinion makes selecting and editing components a breeze. PicMonkey is a very well-rounded platform. It’s easy for a beginner to use, but has enough depth and features to satisfy a designer who wants a bit more control. However, PicMonkey does seem to hide the largest amount of bells and whistles (including full stock library access) behind their paywall.
Which platform should you use?
So, which platform is the best? That depends on what you need! Canva is a great free tool for those who are not the most tech-savvy but want to create a great design. Photopea is great for more advanced designers who want an Adobe Photoshop alternative. Visme is a solid option for businesses who need a platform that will allow them to easily create professional collateral, presentations and web content. Lastly, PicMonkey is great if you have it in your budget to pay for a monthly subscription and if you want a great combination of user-friendly design and customization.