Granting Page permissions using Meta Business Suite
The Page admin invites the person in Meta Business Suite with partial access and Community activity turned on. Use the email on their personal Facebook account: ShortStack only sees Pages that account can access. That access lets them import Facebook or Instagram comments and run Instagram hashtag feeds.
Page access lets someone use ShortStack's Facebook and Instagram tools on a Page they don't own, without the owner sharing a password or giving full admin access. It's what you need to:
- Import comments from a Facebook post or an Instagram post.
- Run an Instagram hashtag feed for the Page's Instagram account.
Before you invite
- Use the email on the person's personal Facebook account. This is the email they log in to Facebook with. ShortStack connects through a personal Facebook account, not a business account, and only sees the Pages that account can access. An invite sent to a work email that isn't their Facebook login won't give ShortStack access.
- Facebook and Instagram need Page access; YouTube doesn't. You can import comments from any YouTube video without anyone's permission.
- Facebook ads only need Page access when you import them by link. Paste the ad's link in the Facebook import. Picking a promoted post from the list instead, or importing an Instagram ad that was never posted to the profile, also needs ad account access. See Get access to promoted (ad) posts.
- The Instagram account must be a Business account linked to the Facebook Page. ShortStack reaches Instagram through the Page. See Troubleshooting issues with feeds and Facebook/Instagram importer tools to check the account type and the link.
Grant access (Page admin)
You need admin access to the business in Meta Business Suite to invite someone.
- Open Meta Business Suite.
- Click Settings in the bottom-left corner.
- The People tab opens by default. If it doesn't, click People in the menu on the left.
- Click Invite People next to the search bar.
- Enter the email address on the person's personal Facebook account.
- Click Next, then turn on Basic under Partial access. This keeps your Page secure while giving limited access.
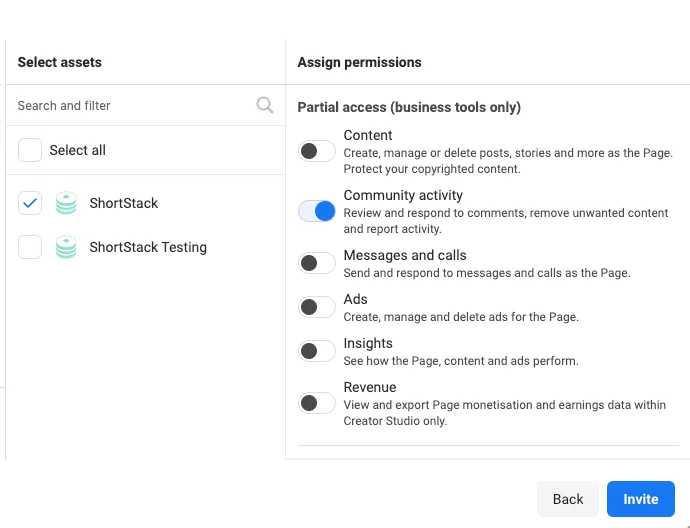
- Under Select Assets, check the Page or Pages they need. Selecting a Page also connects its linked Instagram account, so you don't need to select Instagram separately.
- Turn on Community activity. This lets them review, respond to and remove comments, which ShortStack's feeds and comment imports need.
- Click Invite. A message confirms the invitation was sent.
- Click Done.
The person shows as Pending in your People list until they accept the invitation.
Accept the invitation (invited person)
- Open the invitation email from Facebook in the inbox for your personal Facebook email. It names the business that invited you. If you can't find it, check your spam folder.
- Click Get Started.
- Enter your name in the Your Name field. This is the name shown in Meta Business Suite. Click Continue.
- Confirm the business details and click Continue.
- Click Accept Invitation.
- Enter your Facebook password and click Submit.
Meta Business Suite opens with the client's business.
Get access to promoted (ad) posts
For a Facebook ad, the simplest route is to import it by link, which only needs Page access. You need access to the ad account that ran the ad when you pick a promoted post from the list, or for an Instagram ad that was never posted to the profile. An admin of the Business Manager that owns the ad account does this:
- Open Meta Business Settings.
- Click Accounts, then Ad accounts.
- Select the ad account.
- Click Assign people.
- Add the person to grant access to, and choose View performance. That access level is enough.
Check that access worked
Before you go to ShortStack, confirm the access is really there:
- Look for the Page in your Facebook profile menu. Log in to your personal Facebook account and click your profile picture in the top-right corner. The client's Page should be listed in the drop-down. If it isn't, you don't have access yet.
- Ask the admin for a screenshot of your permissions. It should show your personal Facebook account, not a different email, with Community activity turned on and no pending invite.
Connect the Page in ShortStack
- Stay logged in to your personal Facebook account in the same browser you use for ShortStack.
- Start the feed wizard (on the Dashboard, click Get Social, then Collect Posts) or a social import (Manage > Lists > Social Import, then choose Facebook or Instagram).
- If ShortStack asks you to connect Facebook, sign in and allow every permission it asks for.
- Choose the client's Page, not your own business Page. If it isn't listed, click Refresh Pages.
If the Page doesn't appear
The Page isn't in your Facebook profile menu
The invite went to an email that isn't your personal Facebook login, or it hasn't been accepted. Ask the admin to invite you again using the email on your personal Facebook account, then accept it from that inbox. Check spam if it doesn't arrive.
The Page is in your Facebook menu but not in ShortStack
Reset ShortStack's connection to Facebook:
- On Facebook, click your profile picture, then Settings & privacy > Settings.
- In the menu on the left, scroll to the Your activity section and click Business Integrations.
- Find ShortStack and click Remove.
- Stay logged in to Facebook, but log out of ShortStack and log back in.
- Start the feed wizard or social import again. This reinstalls ShortStack on your Facebook account, so you don't need to add it back yourself.
- Back on Business Integrations (refresh the page if it's still open), click View and edit next to ShortStack and check that every setting slider is on.
If the Page still doesn't show, log out of both Facebook and ShortStack, clear your browser's cookies and cache, log back in to your personal Facebook account, and try again.
Meta shows a permission error
If Facebook shows this message while you connect the Page:
"{permission}" is required in order to give this app access to the permissions you selected.
You don't have access to the ad account behind the promoted post or ad you're importing from. For a Facebook ad, import it by link instead, which only needs Page access. Otherwise, follow Get access to promoted (ad) posts, then connect again.
The Page still won't load
- Click Refresh Pages and try again later. Sometimes the problem is on Meta's side and clears up on its own.
- Send support a diagnostics report. Close the wizard, click Help in the bottom-left corner of ShortStack, then Submit Diagnostics, and click Submit Diagnostics Report. You don't need to add a comment. The report shows support whether your Facebook connection has the permissions it needs. Then contact support@shortstack.com.
If nothing else works
- Have the client create the feed. The client logs in to your ShortStack account in their own browser, while logged in to their own Facebook account, and sets up the feed. Once it's running, you can manage entries, pick winners and run the rest of the campaign from your login. This means sharing your ShortStack login with the client; there's no separate login or team-member access you can give them for this.
- Run the feed without the @mention requirement. For a hashtag feed, connect your own Instagram Business account and leave require @mention off. ShortStack imports every public post with the hashtag, and you check for the client's @mention yourself when you pick winners. You can't limit entries per user or use Rights Management on these entries. This doesn't help with comment imports, which always need access to the Page.
FAQs
Do I need to make the person an admin of my Page?
No. Partial access with the Community activity permission is enough for ShortStack's comment imports and hashtag feeds, so you don't have to hand over full admin access.
Should I connect ShortStack with my own Facebook account or my client's?
Your own personal Facebook account, once the client has given it access to their Page. ShortStack lists every Page that account can reach, and you choose the client's Page from that list. The client only needs to log in if you use the fallback described under If the Page doesn't appear.
Can I import comments from a partner brand's post?
Not without access to that brand's Page. Facebook and Instagram imports only work on Pages your Facebook account can access, so the partner would need to grant you access the same way. YouTube is different — you can import comments from any YouTube video.
Can I publish my campaign to our Facebook Page?
No. Facebook no longer allows direct publishing to Facebook Pages. Publish the campaign as a landing page or embed it on your website instead.
What happens if the admin removes my access?
The admin can edit or remove your access at any time in Meta Business Suite. Once access is removed, ShortStack can no longer read that Page, so feeds and imports for it stop. ShortStack shows an error message and emails you; it sends an email whenever a feed stops, for any reason.
Related resources
Troubleshooting Issues with Feeds and Facebook/Instagram Importer Tools (Help Doc)
List of Facebook Pages is Empty or Missing Pages (Help Doc)
Creating and Managing an Instagram Hashtag Feed (Help Doc)
How to Import Comments and Reactions from Facebook (Help Doc)
Was this helpful?
Thanks — that helps us decide what to fix next.
Sorry this missed. Tell us what you needed and we'll get you an answer — and fix the page.